THE KITCHEN : LACY EDGED PANCAKES BY PARIS STARN

I HAVE BEEN FOLLOWING PARIS on instagram for some time now, and have saved countless of her photogenic recipes - in particular her decadent desserts. i’m so thrilled to be sharing one of her recipes here, one that’s simple but oh so delicious. since following paris, i’ve recently been loving her substack ‘playing with food’ and would fully recommend subscribing for a monthly dose of recipes and kitchen musings in your inbox!
this recipes includes two topping and a second recipe on how to turn these lacy pancakes into a towering pancake
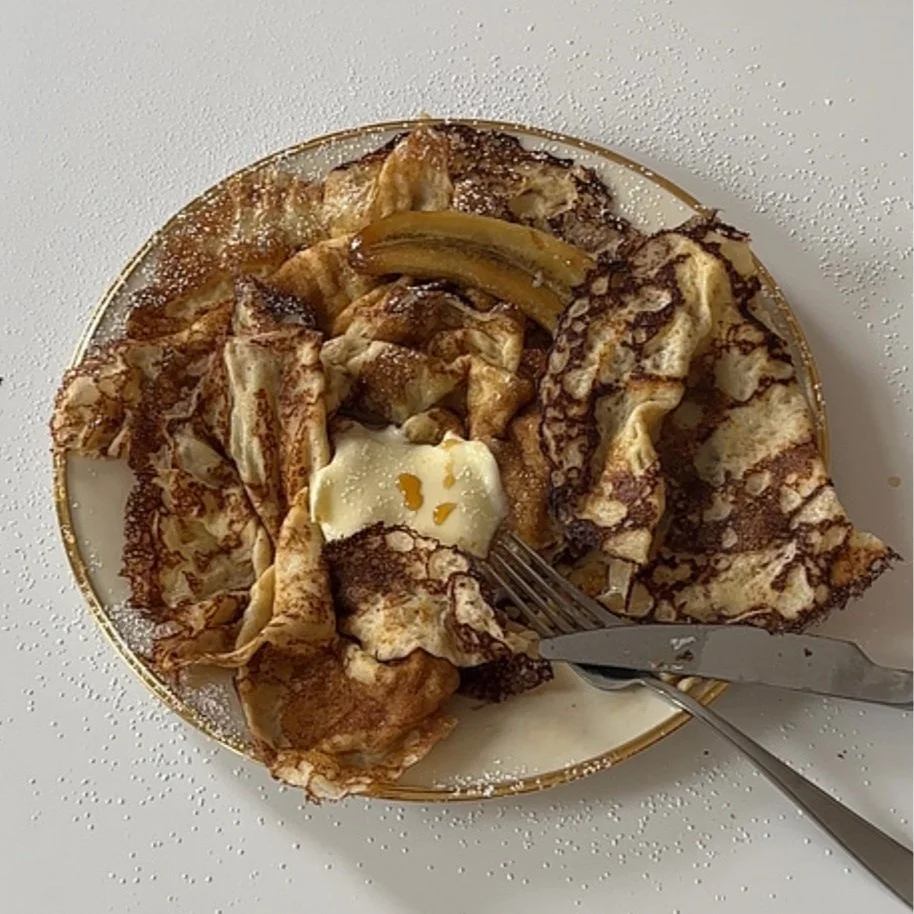
on my first trip to cafe mutton in hudson, ny i got their crêpes (definitely go and try them if you are in the area). they were excellent, and i couldn’t stop thinking about them. unlike the crêpes i had gotten at crêperies in brittany and paris which were uniformly thin and a bit chewy, these were pudgy and tender in the centre with crisp airy edges. cafe mutton’s crêpes were also super buttery and topped with maple syrup. all that said, they were unlike any crêpe i had ever had before, and one of the best pancakes i had ever tried.
eventually, i got around to making some at home, combining ratios and cooking methods of both pannkakor (swedish pancakes) and crêpes to get something that reminded me of the crêpes at cafe mutton.
this recipe has a big pro: it is all made in the blender, and only takes six minutes from start to finish. it also has a con: you have to remember to start it the night before so that the flour has enough time to hydrate.
below, you’ll find recipes for maple-roasted pears and maple bananas, but this is totally optional. these pancakes would be great with just maple syrup and butter (à la cafe mutton). i have also included directions for turning these pancakes into something like a crêpe cake (it's not technically a crêpe cake, more like pancakes stacked with whipped cream).
finally, it’s quite easy to adjust this recipe for any amount of people. i normally don’t advise how many servings a recipe makes since all appetites are different, but this is usually the perfect amount for théo and i, so feel free to multiply the recipe (eg. 1.5x for 3 guests, 2x for 4, etc.)
INGREDIENTS
2 eggs
400g milk
1 tsp diamond crystal kosher salt
15g white sugar
110g all purpose flour
40g of butter (or ghee or clarified butter) melted
100g sparkling water
1/2 tsp baking powder
80g ghee or clarified butter, melted, for frying
-
topping 1: maple roasted pear: (find this recipe towards the bottom of the page, this takes a bit of time, so you may want to make the night before when you make your pancake batter)
1-2 bosc pear(s) (or 2-6 small seckel or forelle pears)
125g maple syrup (you may need more)
pinch of salt
-
topping 2: maple bananas: (find this recipe towards the bottom of the page)
2 bananas (just ripe)
25g butter or ghee or clarified butter
75g maple syrup
pinch of salt
-
MAKE YOUR BATTER THE NIGHT BEFORE
place in your blender bowl the eggs, milk, salt, sugar, and flour. blend on medium speed for about 30 seconds until combined. leave the lid on and place the blender bowl in the fridge overnight
-
COOKING YOUR PANCAKES
preheat a nonstick cooking pan over medium heat on the stove.
remove your pancake batter from the fridge and re-blend for about 10 seconds to re-emulsify the ingredients (the flour will have sunk to the bottom). add the melted butter (or ghee or clarified butter,) sparkling water, and baking powder to the blender and mix again for about 10 seconds.
at this point, your nonstick pan should be hot. place 1-2 teaspoons of the melted ghee or clarified butter into the pan (the amount will depend on the size of the pan you are using, i recommend about 1 teaspoon for an 8” pan, and 2 teaspoons for a 12” pan). swirl the pan to distribute it across the surface and then quickly pour in your batter: about 45g-50g for an 8” pan, and 90g-100g for a 12” pan. the batter will sputter and bubble - use the handle to quickly swirl the pan and distribute the batter across the entire surface. i like to leave the middle of the pancake thicker than the edges.
let the pancake fry undisturbed for about 90 seconds (give or take 30 seconds depending on the heat of your pan - if you are using a 12” pan it could take an additional minute). you will eventually notice the edges becoming a darker brown. at this point, you can take a soft spatula and run it around the rim of the pancake to release it from the pan and then wiggle the spatula underneath to flip it. let the pancake cook for another 45 seconds to a minute and then transfer it to a plate.
continue making the rest of the pancakes by repeating the process outlined in the previous two paragraphs. top with the maple-roasted pears or maple bananas, and the maple syrup leftover from cooking the fruit.

MAPLE ROASTED PEARS
you can make these pears the evening before, or the morning of…
preheat the oven to 350f/180c
if you are using bosc pears, slice them in half and remove the core (i use a melon baller, but a spoon also works if your pears are ripe). If you are using smaller pears, slicing in half is optional, you can also just leave them unsliced and use a corer or knife to remove the core from the bottom of the pear.
line a super small baking dish that neatly fits the pears with parchment paper. place your pears (if sliced in half, start open side up) and top with the maple syrup. transfer to the oven and bake for 45 minutes. flip the pears every 15 minutes so all sides have an opportunity to soak up the maple syrup. after the 45-minute mark, turn off the oven and let the pears and maple syrup sit in the warm oven for an hour (if you sliced the pears in half make sure they are open side down for this part). this extra time in the oven will continue to slowly cook the pears, and allow for the maple syrup to really soak in.
if you are making the pears the night before, you only need to leave them in the warm oven for 30 minutes after turning off. let them cool to room temperature then cover and place the baking dish in the fridge overnight. be sure to briefly re-warm them before serving the following day.
MAPLE BANANAS
slice your bananas in half lengthwise (if your pan isn’t large enough feel free to dice up your bananas into 1/2” thick slices, this is also the best way to prepare them for the cake).
place the butter or ghee or clarified butter and maple syrup in a medium sized saute pan, and place over medium heat. let the banana cook, undisturbed, for about two minutes until starting to caramelize. then flip and cook for another minute to two minutes. remove from the heat and serve while hot

PANCAKE CAKE
-
INGREDIENTS
(multiply this by 1.25x to make enough cream to dollop on top)
400g of cream
100g of creme fraiche or mascarpone
10g of vanilla extract
1/2 tsp salt
50g brown sugar
one recipe of the pancakes & a double recipe of either the maple bananas, or maple roast pears, cooled and their leftover syrup
-
to make the cake, cook all your pancakes, transferring each one to a baking sheet, to let cool, as soon as it is done cooking. if you are using an 8” skillet, you should have about 18 pancakes, while a 12” skillet will yield 8-9 pancakes.
to make the cream, place all of the ingredients in a large bowl and whip with a hand mixer until you get soft peaks. taste the cream and adjust as you see fit. keep in mind that if it’s not sweet enough, you will be brushing maple syrup on the pancake during assembly.
set up your assembly station: get a cake plate/cake stand, an ice cream scoop and spatula for the whipped cream, the remaining maple syrup from roasting the pears, and a pastry brush (i like silicone for this if you have one). if you are using maple-roasted bananas those will go inside the cake as well.
place a small amount of cream in the center of the cake plate/stand. then take a pancake and brush with the maple syrup. transfer the pancake to the cake plate and top with a dollop of cream (i use about 1/4 cup for the 8” pancakes, and 1/2 cup for the 12” pancakes). spread out the cream with a soft spatula, and if you are using the bananas add a few slices of them here (save the pears for decoration on top, if added to the center they will leak out juices). repeat this with the rest of your pancakes. you should end up using all of the cream, and most of–if not all–your maple syrup (it will really depend on how the syrup reduced and how much your pears soaked up, i used about 100g in total). if you are making the pear version, decoratively place your roasted pears on top. feel free to add an extra drizzle of maple syrup. slice, serve, and enjoy!